Beauty Blunders & How to Fix Them
A few weeks ago my lovely Aunt gave me the idea for a blog post on how to fix little makeup mistakes that you may encounter during your daily routine. I thought that this was a great idea and I wanted to make a post for all of you to enjoy. Even the most skilled makeup artists make mistakes here and there, it's all about how you fix them to have that flawless face! So without further ado, let's get into this.
1. Starting with base makeup before the eyes
I'll be honest with you here, this is my personal opinion when it comes to makeup application. I think you will save yourself time and makeup by starting with the eyes. The number one reason is because of eyeshadow fall out. Fall out is eyeshadow remnants that fall down underneath the eye area and sometimes onto the cheek bones. It is a lot easier to clean up if you don't already have foundation on. This is just my personal preference when it comes to eye makeup, I like to be able to clean the under eye area without messing up my foundation.
2. Unblended eyeshadow

I hope you are able to see a difference between these two pictures even though it is very slight! Sometimes blending eyeshadow can be extremely frustrating, I get it. But when you do, it makes a world of difference. Using a fluffy dome-shaped brush really helps this process, it is like your magic wand. My favorite two brushes for this are the Sigma E40 and E35.

In this picture the shadow is more diffused and blown out all over the crease and lid space. You can tell that the eyeshadow doesn't have any harsh edges or look too rounded on the outer portion of the crease. This helps the eyeshadow look appear effortless and less precise! [Sigma brush linked in picture] Running a clean brush throughout the crease in windshield wiper motions helps to achieve this look.
3. Cleaning up eyeliner

As you can see in this photo, I have quite a bit of eyeshadow fall-out, and my eyeliner isn't as sharp as I would like.

Q-tips are about to be your new BFF. To clean up fall-out and sharpen up the eyeliner, I saturate the end of a Q-tip in eye makeup remover and easily clean up this area. You are able to sharpen that liner right up by running the Q-tip right underneath the liner to clean up any excess eyeshadow!

Voila! You are left with a sharp wing and a clean under eye area.
4. How to clean up your eyebrows

We've all gone overboard with the brows from time to time! Sometimes in a rush I will even slip and go outside of my brow line, but this is a really easy fix.

Just take a flat definer brush (this one is from Anastasia Beverly Hills) and concealer to cover your slip up. I just run the brush right over where I want to fix the mistake.

And just like that, you have flawless brows again!
5. Muddy looking bronzer/too much bronzer

I feel like my bronzer comes down a little too far when I am at my palest (I hate you winter). It is pretty easy to clean this up.

To sharpen up your contour and "erase" some of that bronzer, I just load up my beauty blender with translucent powder and swipe it on the area where I want less bronzer. I let the powder sit on that area for about 5 minutes or so and I start to work on other areas of the face.

The finished result is a cleaner and sharper bronzer look. I like this too because I feel like it also lifts the face up, because the bronzer isn't coming down too low.
6. How to tone down blush

I love this peach shade of blush but even the smallest amount looks too bright for my liking. This is another easy fix.

To tone it down, I take a duo fiber brush from Sigma and just swirl it all over the area of the blush to melt it into the skin and also brush off a little more of the blush. Brushes that are high quality are truly going to become a NEED in your makeup arsenal. [Duo fiber brush linked in picture]

You are left with blush that is more diffused and also quite a bit toned down! I like this look because it looks more like a natural flush and less crazy bright.
7. Mascara boo boo

We've all been there, in a hurry and then stabbed yourself somewhere with mascara.

Didn't I say Q-tips will be your BFF? To clean up this mistake, wait for the mascara to dry completely and then roll a Q-tip over it and it will disappear.

You're left with your mascara where it's supposed to be, on your lashes!
8. Lipstick outside of your lip line

This is one of the easiest things to do when you are applying a liquid lipstick without a lip liner. I don't really care for lip liner all that much so I tend to shy away from it.

This is another easy fix. I take the same brush and concealer I used for my brows and clean up the outside edges of my lipstick.

And it is all better!

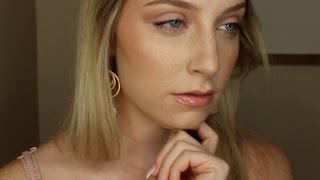
Here is the finished look!
I hope you guys liked this post and hopefully learned a few new things to up your makeup game. You will have to let me know if you try any of these out and if you liked this post and want others like it in the future. Until next time!